
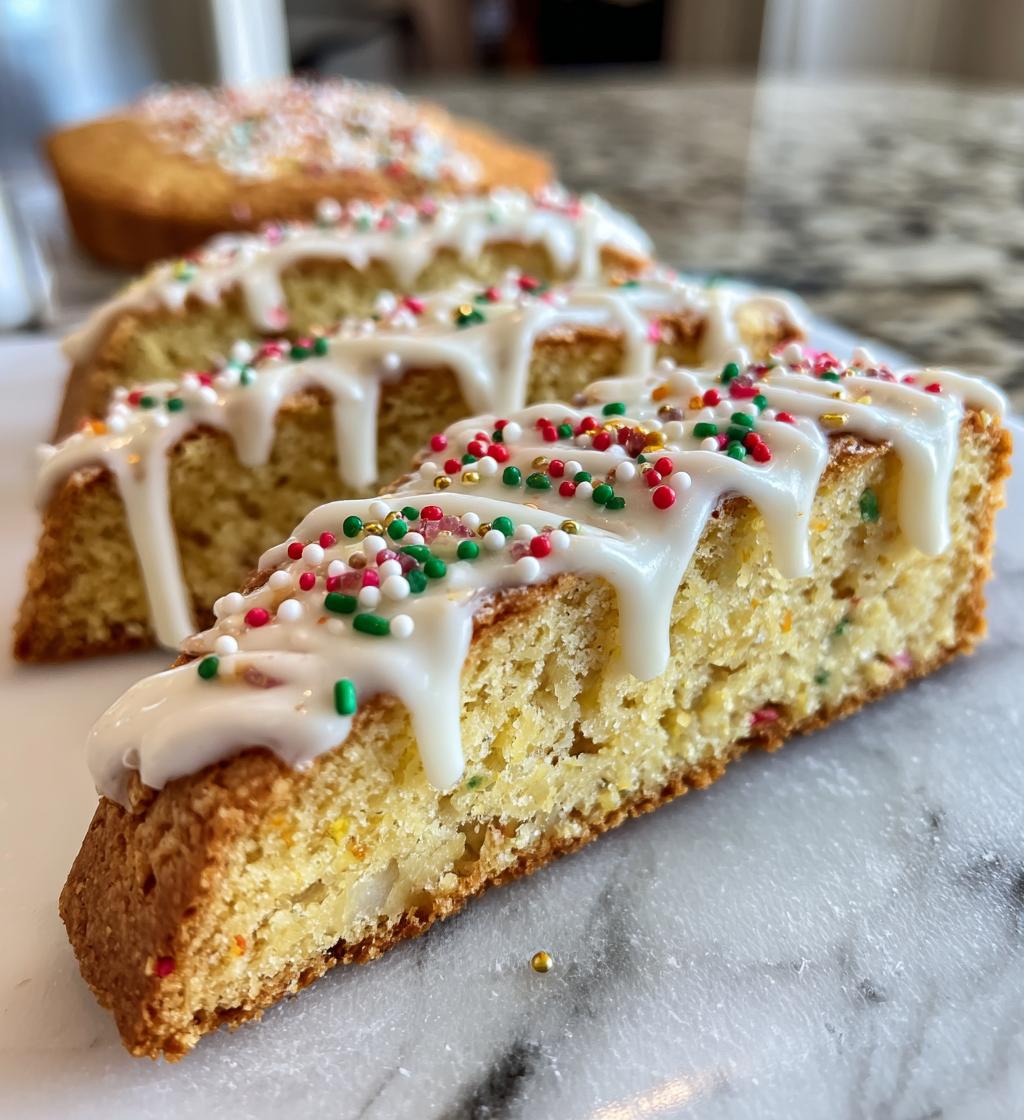
There’s something magical about baking biscotti di natale decorati ghiaccia during the holidays—the smell of vanilla and toasted almonds filling the kitchen, the joy of drizzling colorful icing, and the way they look piled high on a festive plate. I remember my Nonna teaching me how to make these when I was little, her hands guiding mine as we shaped the dough. Now, it’s my favorite tradition every December! These twice-baked Italian cookies are crisp, lightly sweet, and oh-so-fun to decorate. Whether you’re gifting them or keeping them all for yourself (no judgment here!), they’re the perfect way to add a little sparkle to your holiday table.
Why You’ll Love These Biscotti di Natale Decorati Ghiaccia
- They’re the perfect festive treat—gorgeous enough for a cookie swap but easy enough for weeknight baking
- The crisp texture holds up beautifully to icing and sprinkles (no sad, soggy cookies here!)
- That heavenly almond-vanilla flavor pairs perfectly with coffee or hot chocolate
- Twice-baked means they stay fresh for days—if they last that long!
- Kids love decorating them (and let’s be honest, adults do too)
- Makes your kitchen smell like a Christmas bakery—pure magic
- Wrap them in cellophane with ribbon for instant edible gifts
- The dough is super forgiving—no need for perfection when shaping
- You probably have most ingredients in your pantry already
- They look fancy but secretly require minimal effort (our little secret)
Ingredients for Biscotti di Natale Decorati Ghiaccia
(Tip: Measure everything before starting—trust me, it makes the process so much smoother!)
- 2 cups all-purpose flour (spooned and leveled to avoid dense biscotti)
- 1 cup granulated sugar (I use regular white sugar, but you can substitute half with brown sugar for depth)
- 1 tsp baking powder (the little lift that makes them just-right crunchy)
- 1/4 tsp salt (balances the sweetness—don’t skip it!)
- 3 large eggs (room temperature blends better—I leave them out for 30 minutes)
- 1 tsp pure vanilla extract (the good stuff makes all the difference)
- 1/2 cup chopped almonds (toast them first for extra flavor if you’re feeling fancy)
- 1 cup powdered sugar (for that snowy icing—sift it to avoid lumps)
- 2 tbsp milk (whole milk gives the creamiest icing, but any works)
- Food coloring (gel works best for vibrant hues without thinning the icing)
- Sprinkles/nonpareils (because more is more at Christmas!)
Equipment Needed
(Don’t worry—you probably already have most of these in your kitchen!)
- Large mixing bowl (for combining all those delicious ingredients)
- Baking sheet (lined with parchment paper—trust me, cleanup is a breeze)
- Sharp knife (for slicing those biscotti logs like a pro)
- Wire rack (lets your biscotti cool evenly before decorating)
- Small bowl (for mixing that snowy icing)
- Spoon or piping bag (for drizzling icing with flair)
How to Make Biscotti di Natale Decorati Ghiaccia
Okay, let’s get baking! These biscotti come together in simple steps, but I’ll walk you through each one so they turn out perfectly crisp and ready for their festive makeover.
Preparing the Dough
- Preheat your oven to 350°F (175°C) and line a baking sheet with parchment paper. Pro tip: If your oven runs hot, drop it to 325°F—better safe than burnt cookies!
- In a large bowl, whisk together the flour, sugar, baking powder, and salt. Don’t skip the whisking—it keeps everything light and avoids dense biscotti.
- Make a well in the center and add the eggs and vanilla. Use a wooden spoon to mix until just combined—the dough will be thick and slightly sticky (that’s perfect!).
- Gently fold in the chopped almonds. If the dough feels too wet, add a tablespoon of flour, but resist the urge to overmix!
Shaping and First Bake
- Divide the dough in half. On your prepared baking sheet, shape each half into a log about 12 inches long and 2 inches wide. They’ll spread a bit, so leave space between them.
- Bake for 25 minutes until golden and firm to the touch. They won’t be fully crisp yet—that’s what the second bake is for!
- Let the logs cool on the pan for 10 minutes (any less and they’ll crumble when slicing; any more and they’ll be too hard).
Slicing and Second Bake
- Transfer the logs to a cutting board. Using a sharp serrated knife, slice diagonally into 1/2-inch pieces. Gentle sawing motions work best—no squishing!
- Arrange the slices cut-side down on the baking sheet. Bake for 5 minutes, flip, then bake another 5 minutes until lightly golden and crisp. Watch closely—they go from perfect to overdone fast!
Decorating with Icing
- Let the biscotti cool completely on a wire rack (warm cookies = melty icing disaster). Meanwhile, whisk powdered sugar and milk until smooth. Want thicker icing? Add more sugar. Thinner? More milk—just a teaspoon at a time!
- Add food coloring if using (gel gives vibrant color without thinning). Drizzle with a spoon or pipe from a ziplock bag with the corner snipped. Immediately add sprinkles—the icing sets fast!
- Let dry completely (about 1 hour) before stacking or gifting. Patience is hard, but it’s worth it!
Tips for Perfect Biscotti di Natale Decorati Ghiaccia
Want bakery-worthy biscotti every time? Here are my tried-and-true secrets:
- Slice like a pro: Use a gentle sawing motion with a sharp knife—no pressing down or the edges will crumble.
- Icing control: Too thick? Add milk drop by drop. Too runny? Stir in more powdered sugar until it ribbons off the spoon.
- Sprinkle strategy: Toss sprinkles on immediately after icing—they’ll stick better than if you wait.
- Storage hack: Layer them between parchment paper in an airtight container to keep icing from smudging.
- Freshness trick: Revive slightly soft biscotti by popping them in a 300°F oven for 5 minutes.
Variations and Substitutions
One of the best things about these biscotti? You can mix them up however you like! Here are some of my favorite twists:
- Nut swap: Try pistachios or hazelnuts instead of almonds—or skip nuts entirely if allergies are a concern.
- Citrus zing: Add the zest of an orange or lemon to the dough for a bright holiday flavor.
- Chocolate love: Stir in 1/2 cup mini chocolate chips or dip one end in melted chocolate after icing.
- Spiced: Mix in 1 tsp cinnamon or pumpkin spice for a cozy winter vibe.
- Gluten-free: Use a 1:1 GF flour blend—the texture still turns out great!
Serving and Storing Biscotti di Natale Decorati Ghiaccia
These biscotti are meant to be shared—whether piled high on a holiday platter with a steaming pot of espresso (my Nonna’s favorite way) or tucked into pretty boxes tied with ribbon for friends. They’re practically begging to be dunked in coffee, hot chocolate, or even sweet wine! For storage, keep them in an airtight container at room temperature for up to 2 weeks (if they last that long). The icing stays perfect, but you can always refresh their crispness with a quick 5-minute warm-up in a low oven. Oh, and they freeze beautifully—just layer them between parchment in a freezer bag for up to 3 months. Thaw at room temperature when the cookie craving strikes!
Nutritional Information
Just a heads up—these numbers are estimates and might vary based on your exact ingredients. But per biscotto, you’re looking at roughly 120 calories, 3g fat, and 8g sugar. Not bad for a festive treat!
Frequently Asked Questions
Can I freeze biscotti di natale decorati ghiaccia?
Absolutely! Freeze them before decorating for best results. Just wrap tightly in plastic wrap or store in an airtight container for up to 3 months. Thaw at room temperature, then ice them fresh—the icing tastes best when added right before serving.
How long does the icing take to dry?
Usually about an hour, but it depends on how thick you make it. Pro tip: If you’re in a hurry, pop them in the fridge for 15 minutes to speed things up. Just don’t stack them until fully set!
Why did my biscotti crumble when slicing?
They probably needed more cooling time after the first bake. Let them rest for that full 10 minutes—it makes all the difference! Also, always use a sharp serrated knife with a gentle sawing motion.
Can I make these without nuts?
Of course! Just skip the almonds or replace them with dried cranberries or citrus zest for a festive twist. The texture will still be wonderfully crisp.
How far in advance can I decorate them?
The biscotti themselves keep well for weeks, but decorate no more than 2 days ahead for the freshest look. The icing stays perfect, but sprinkles might bleed color if stored too long.
3 Irresistible Biscotti di Natale Decorati Ghiaccia Recipes
- Total Time: 55 minutes
- Yield: 24 biscotti 1x
- Diet: Vegetarian
Description
Decorated Christmas biscotti with icing, perfect for festive occasions.
Ingredients
- 2 cups all-purpose flour
- 1 cup sugar
- 1 tsp baking powder
- 1/4 tsp salt
- 3 eggs
- 1 tsp vanilla extract
- 1/2 cup almonds, chopped
- 1 cup powdered sugar
- 2 tbsp milk
- Food coloring (optional)
- Sprinkles (optional)
Instructions
- Preheat oven to 350°F (175°C). Line a baking sheet with parchment paper.
- Mix flour, sugar, baking powder, and salt in a bowl.
- Add eggs and vanilla extract. Mix until dough forms.
- Fold in chopped almonds.
- Shape dough into logs and bake for 25 minutes.
- Let cool, then slice diagonally.
- Bake slices for another 10 minutes.
- Mix powdered sugar and milk for icing. Add food coloring if desired.
- Drizzle icing over biscotti and add sprinkles.
- Let icing dry before serving.
Notes
- Store in an airtight container for freshness.
- Adjust icing consistency with more milk or sugar.
- Prep Time: 20 minutes
- Cook Time: 35 minutes
- Category: Dessert
- Method: Baking
- Cuisine: Italian
Nutrition
- Serving Size: 1 biscotto
- Calories: 120
- Sugar: 8g
- Sodium: 50mg
- Fat: 3g
- Saturated Fat: 0.5g
- Unsaturated Fat: 2g
- Trans Fat: 0g
- Carbohydrates: 20g
- Fiber: 1g
- Protein: 3g
- Cholesterol: 25mg
Keywords: Christmas biscotti, decorated biscotti, Italian cookies, festive baking